¶ Overview
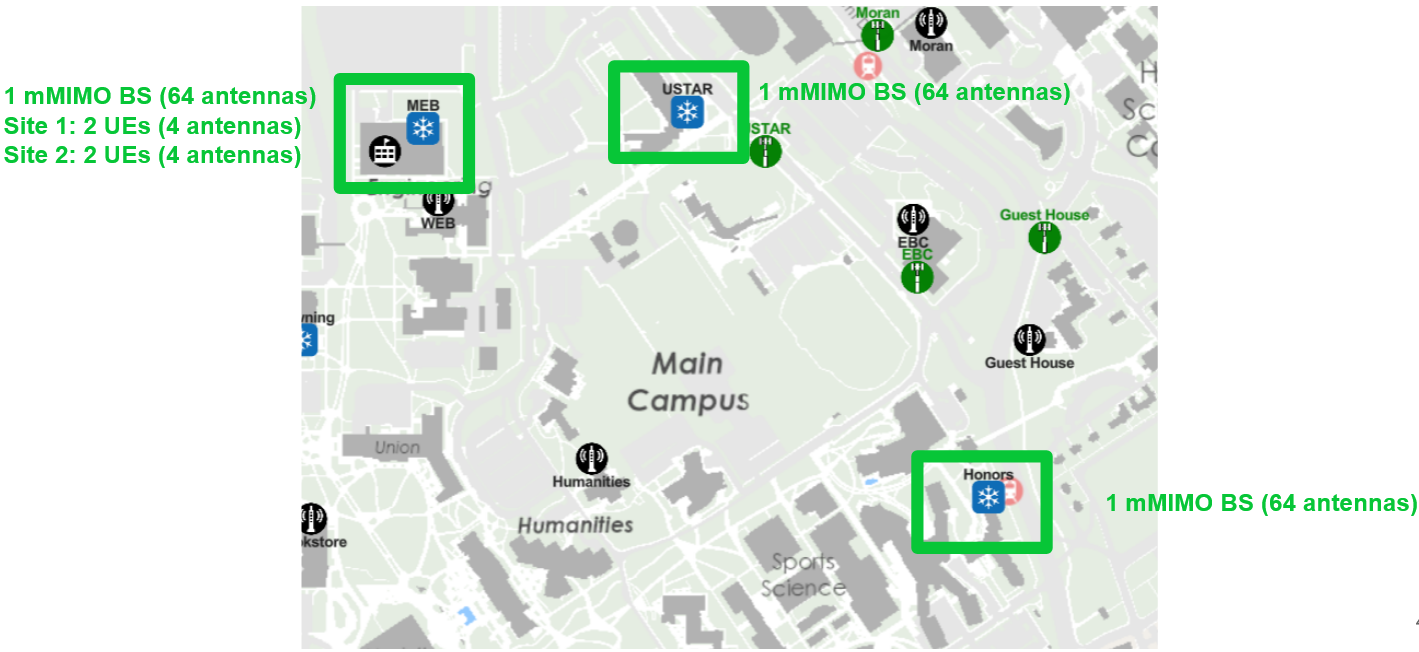
Currently, we have three active mMIMO basestation deployments at The University of Utah's POWDER wireless testbed. The setup consists of an outdoor deployment comprised of three 64-antenna base station and four 2-antenna UEs. In this page we describe these setups and provide step-by-step instructions for how to get started with the platform.
¶ Hardware Deployments
¶ MEB (Merrill Engineering Building) Rooftop Setup
- 1, 64-Antenna Basestation
- 2, Client Sites composed of two 2-antenna UEs
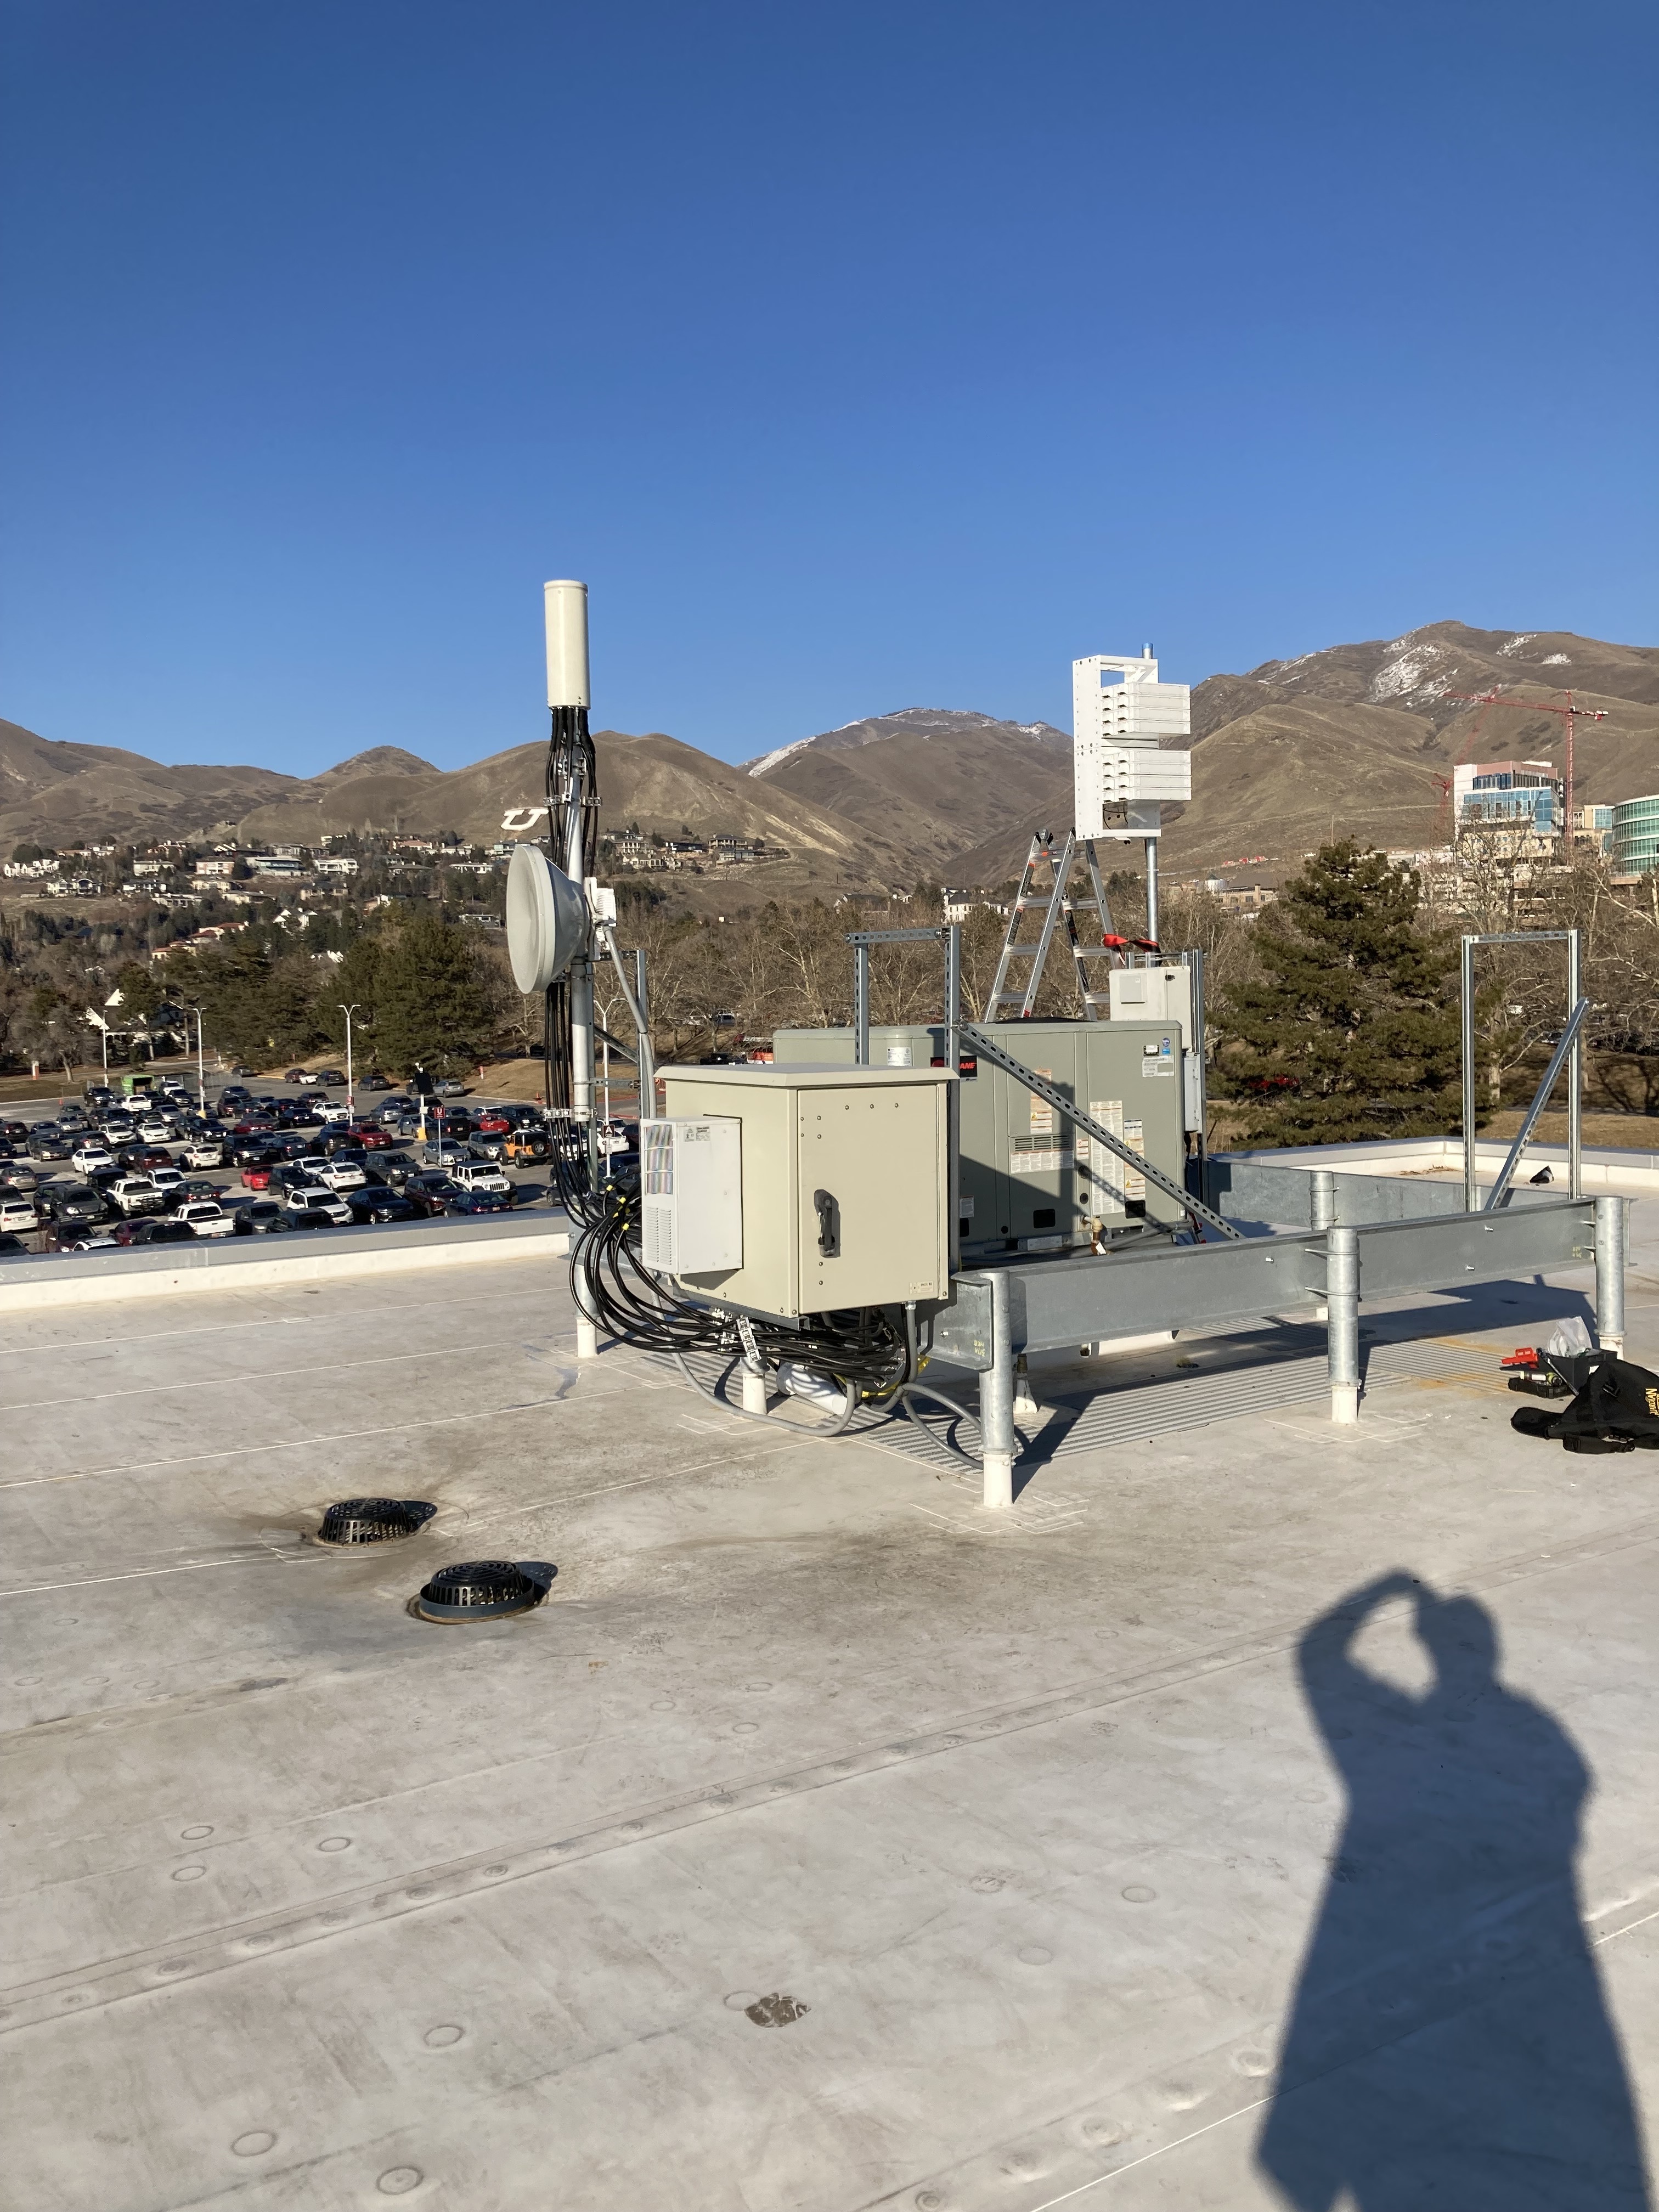
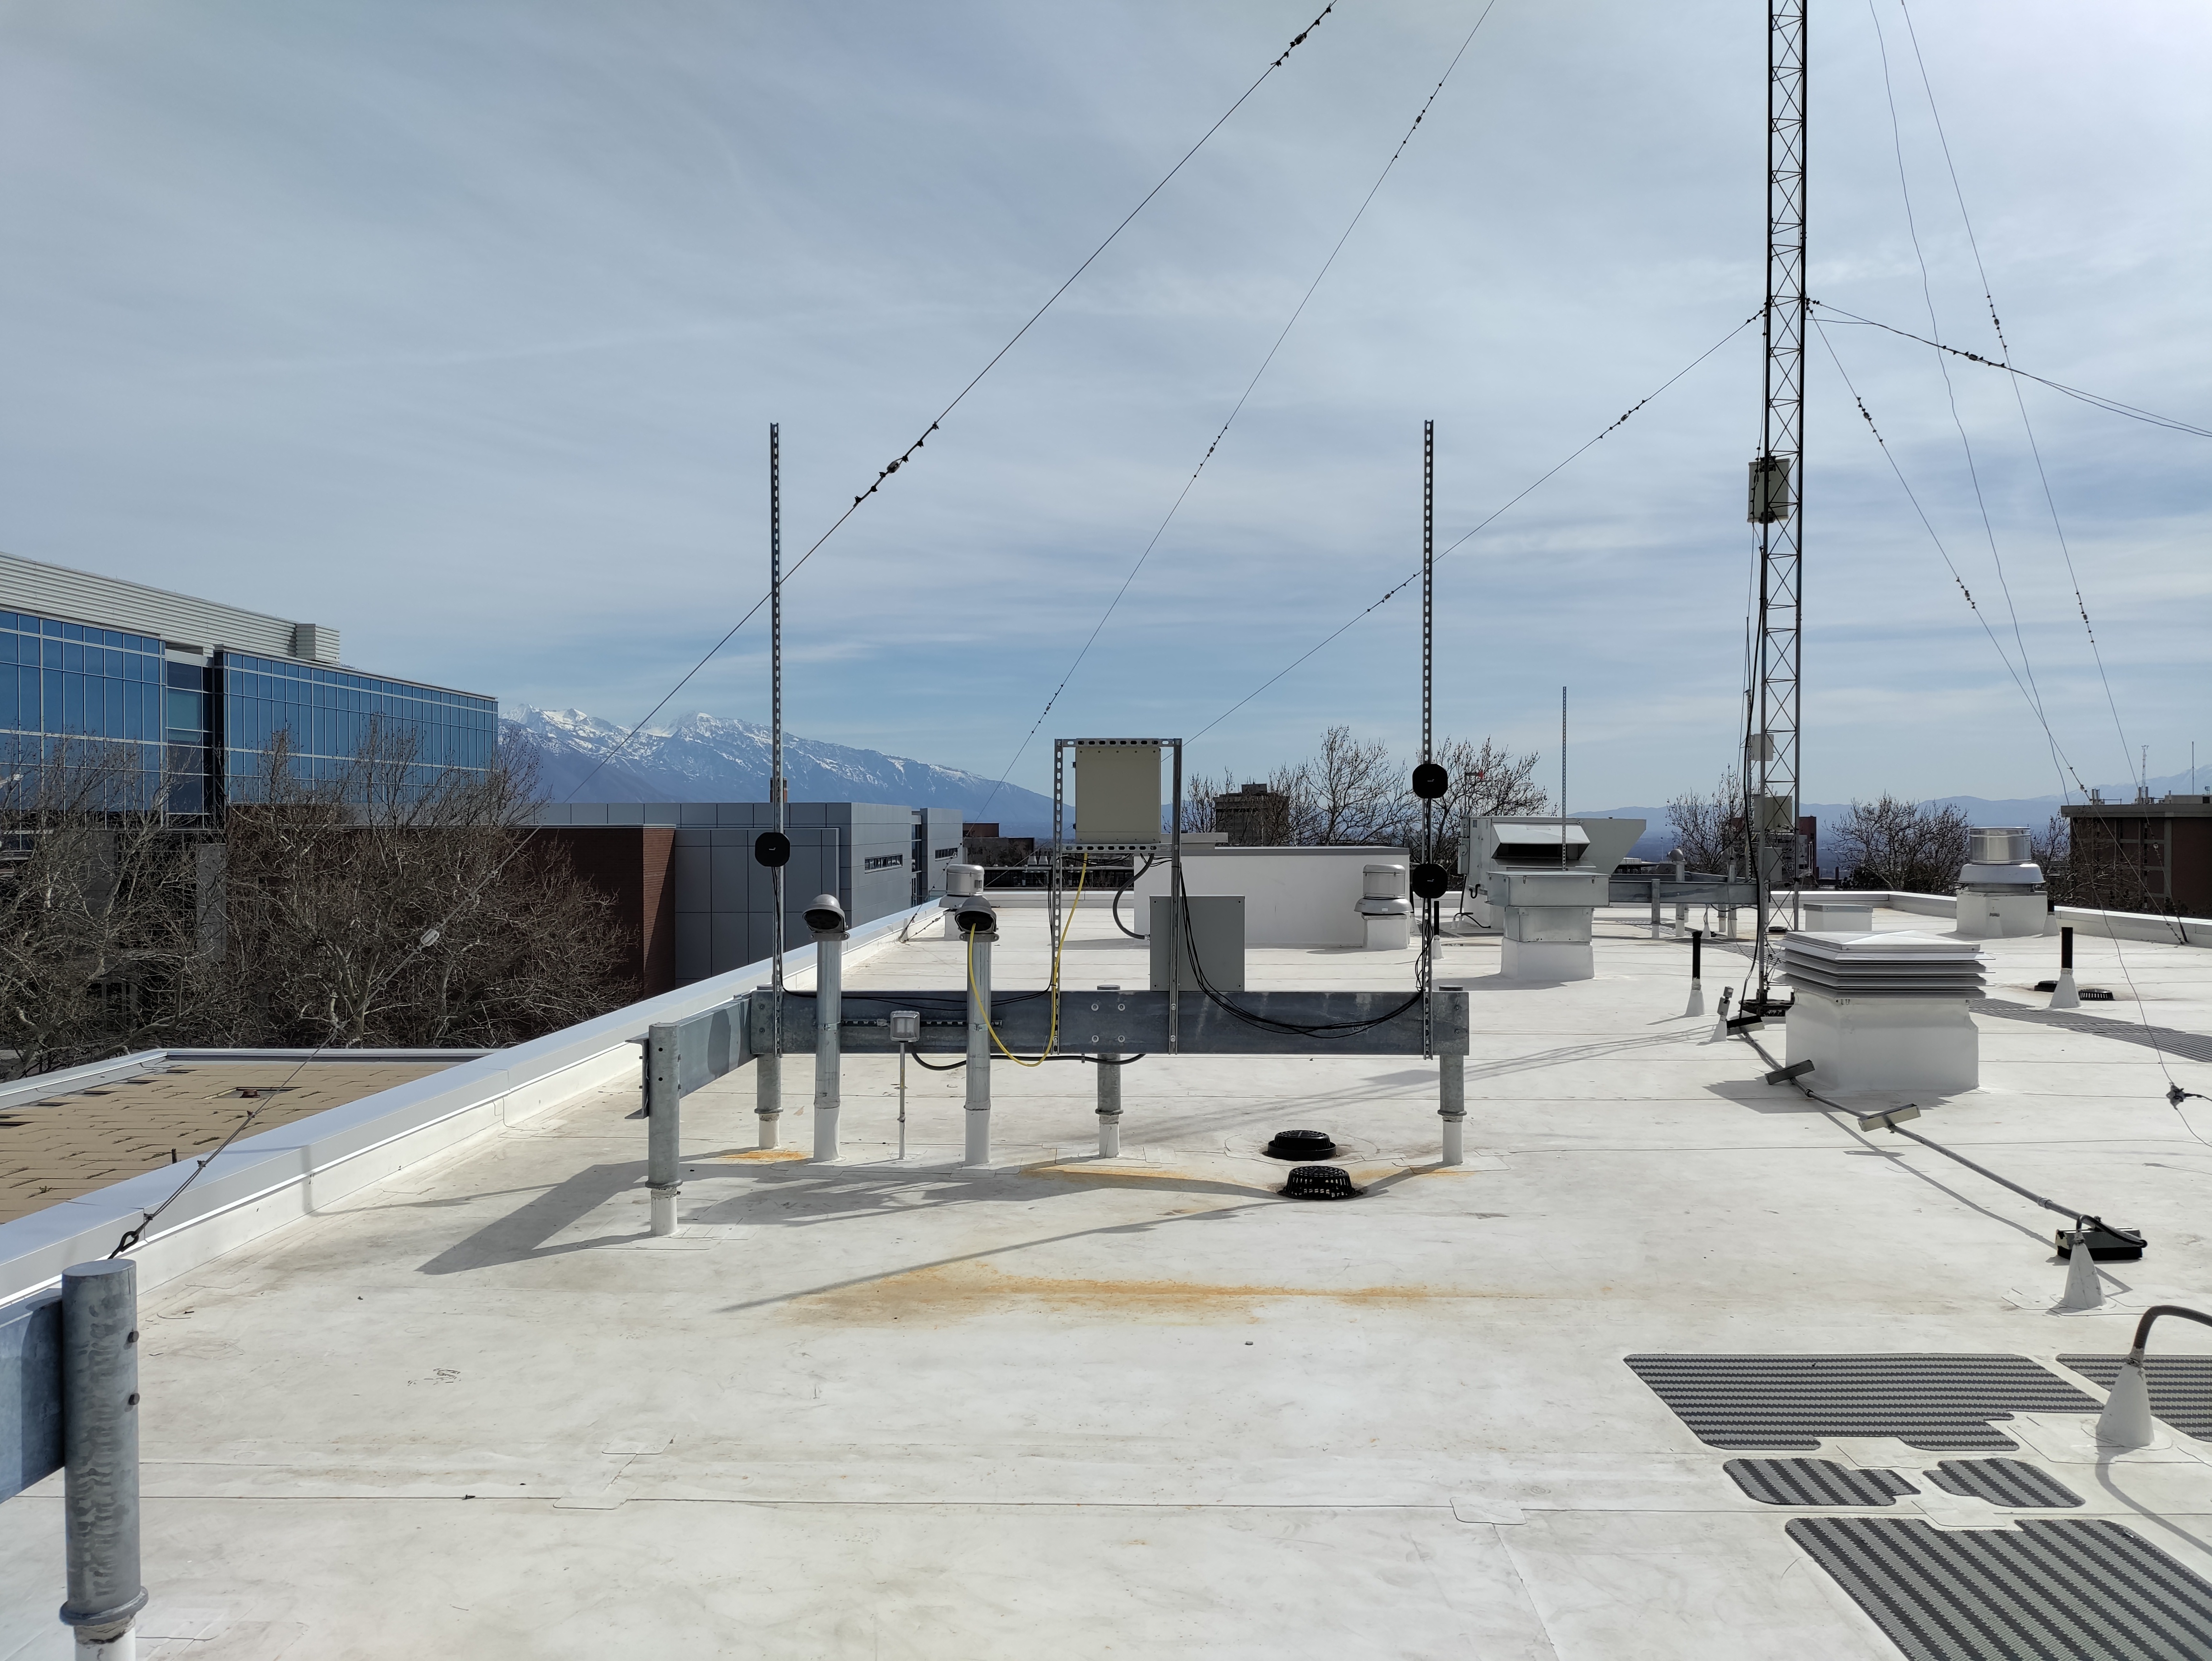
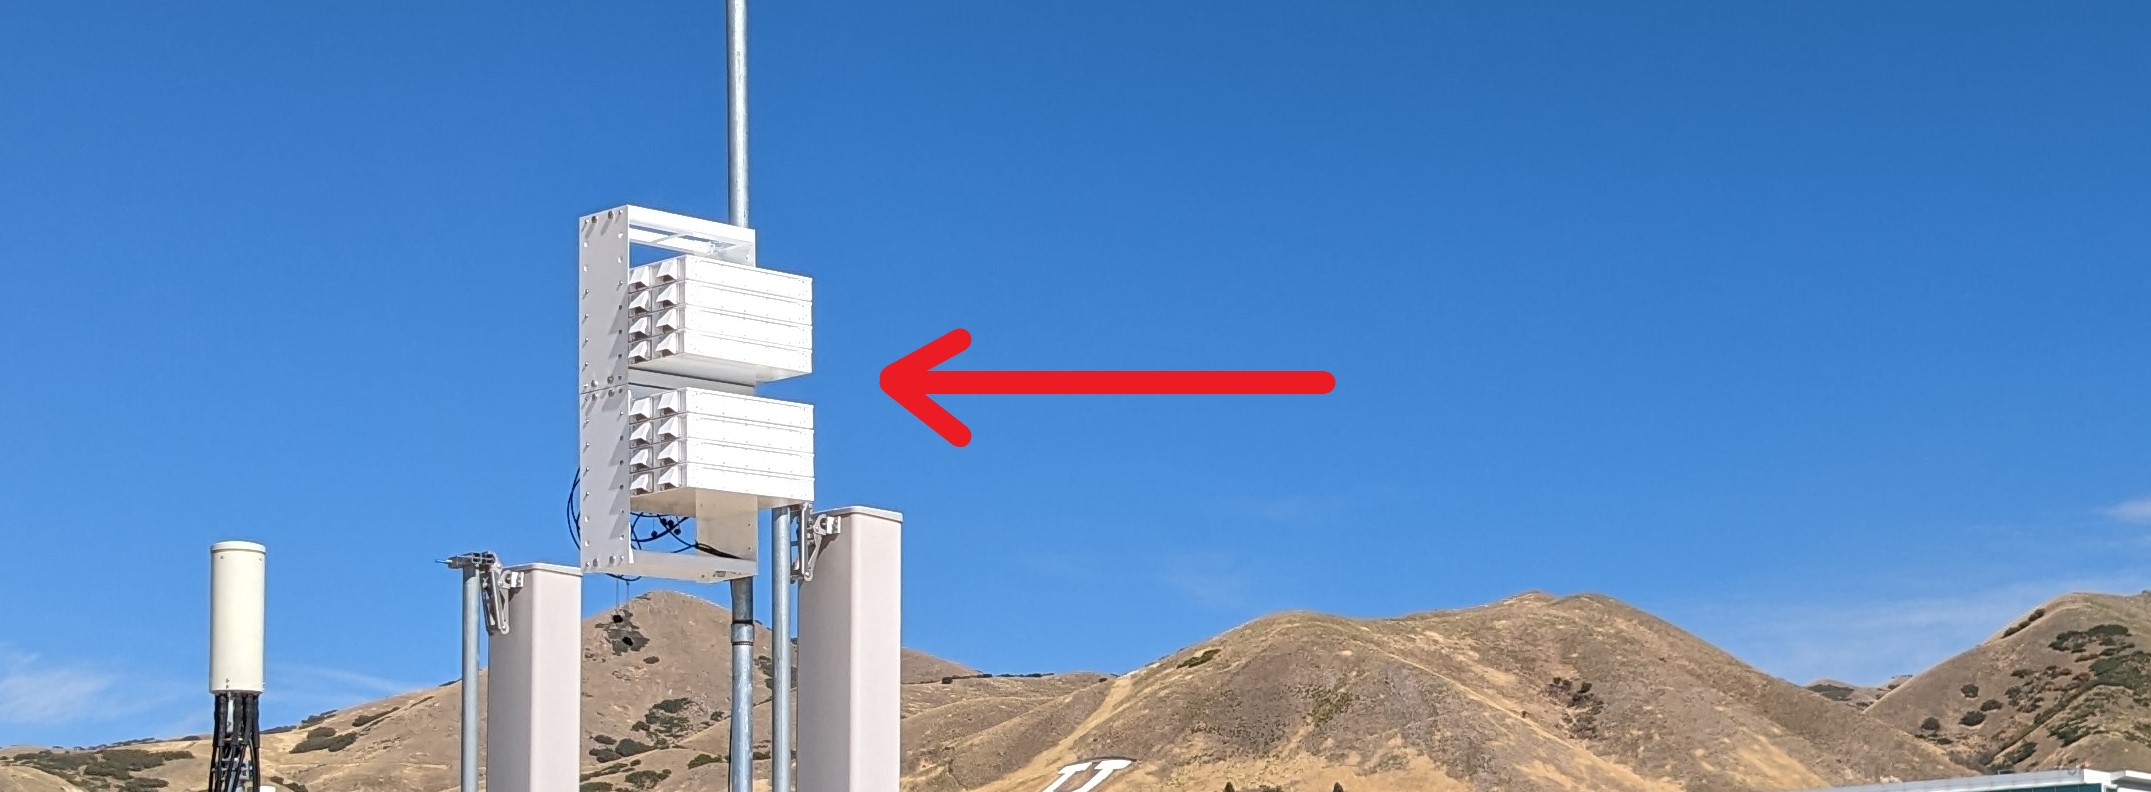
The outdoor deployment features a 64-antenna base station, as shown in the picture on the left. The base station consists of 8 RRHs, each containing four 2x2 MIMO Iris SDRs. Due to regulatory constraints, this system can only operate in the CBRS band (currently, users are only allowed to transmit in the channels between 3540 MHz and 3600 MHz). We have noticed some third-party interference signals between 3550 MHz and 3600 MHz so we suggest users reserve the range 3540 to 3550 MHz. The base station is installed on the rooftop of the Merrill Engineering Building (MEB), at the University of Utah campus.
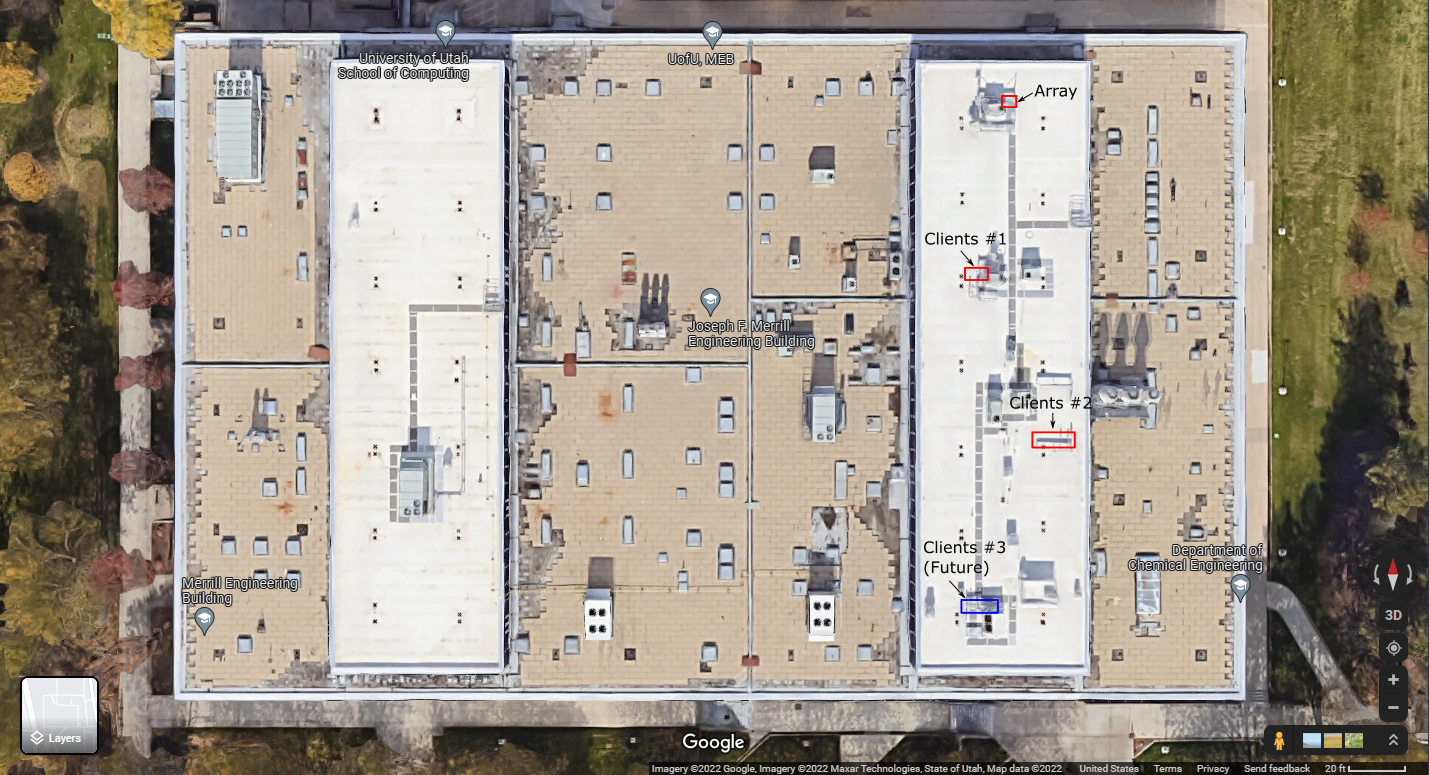
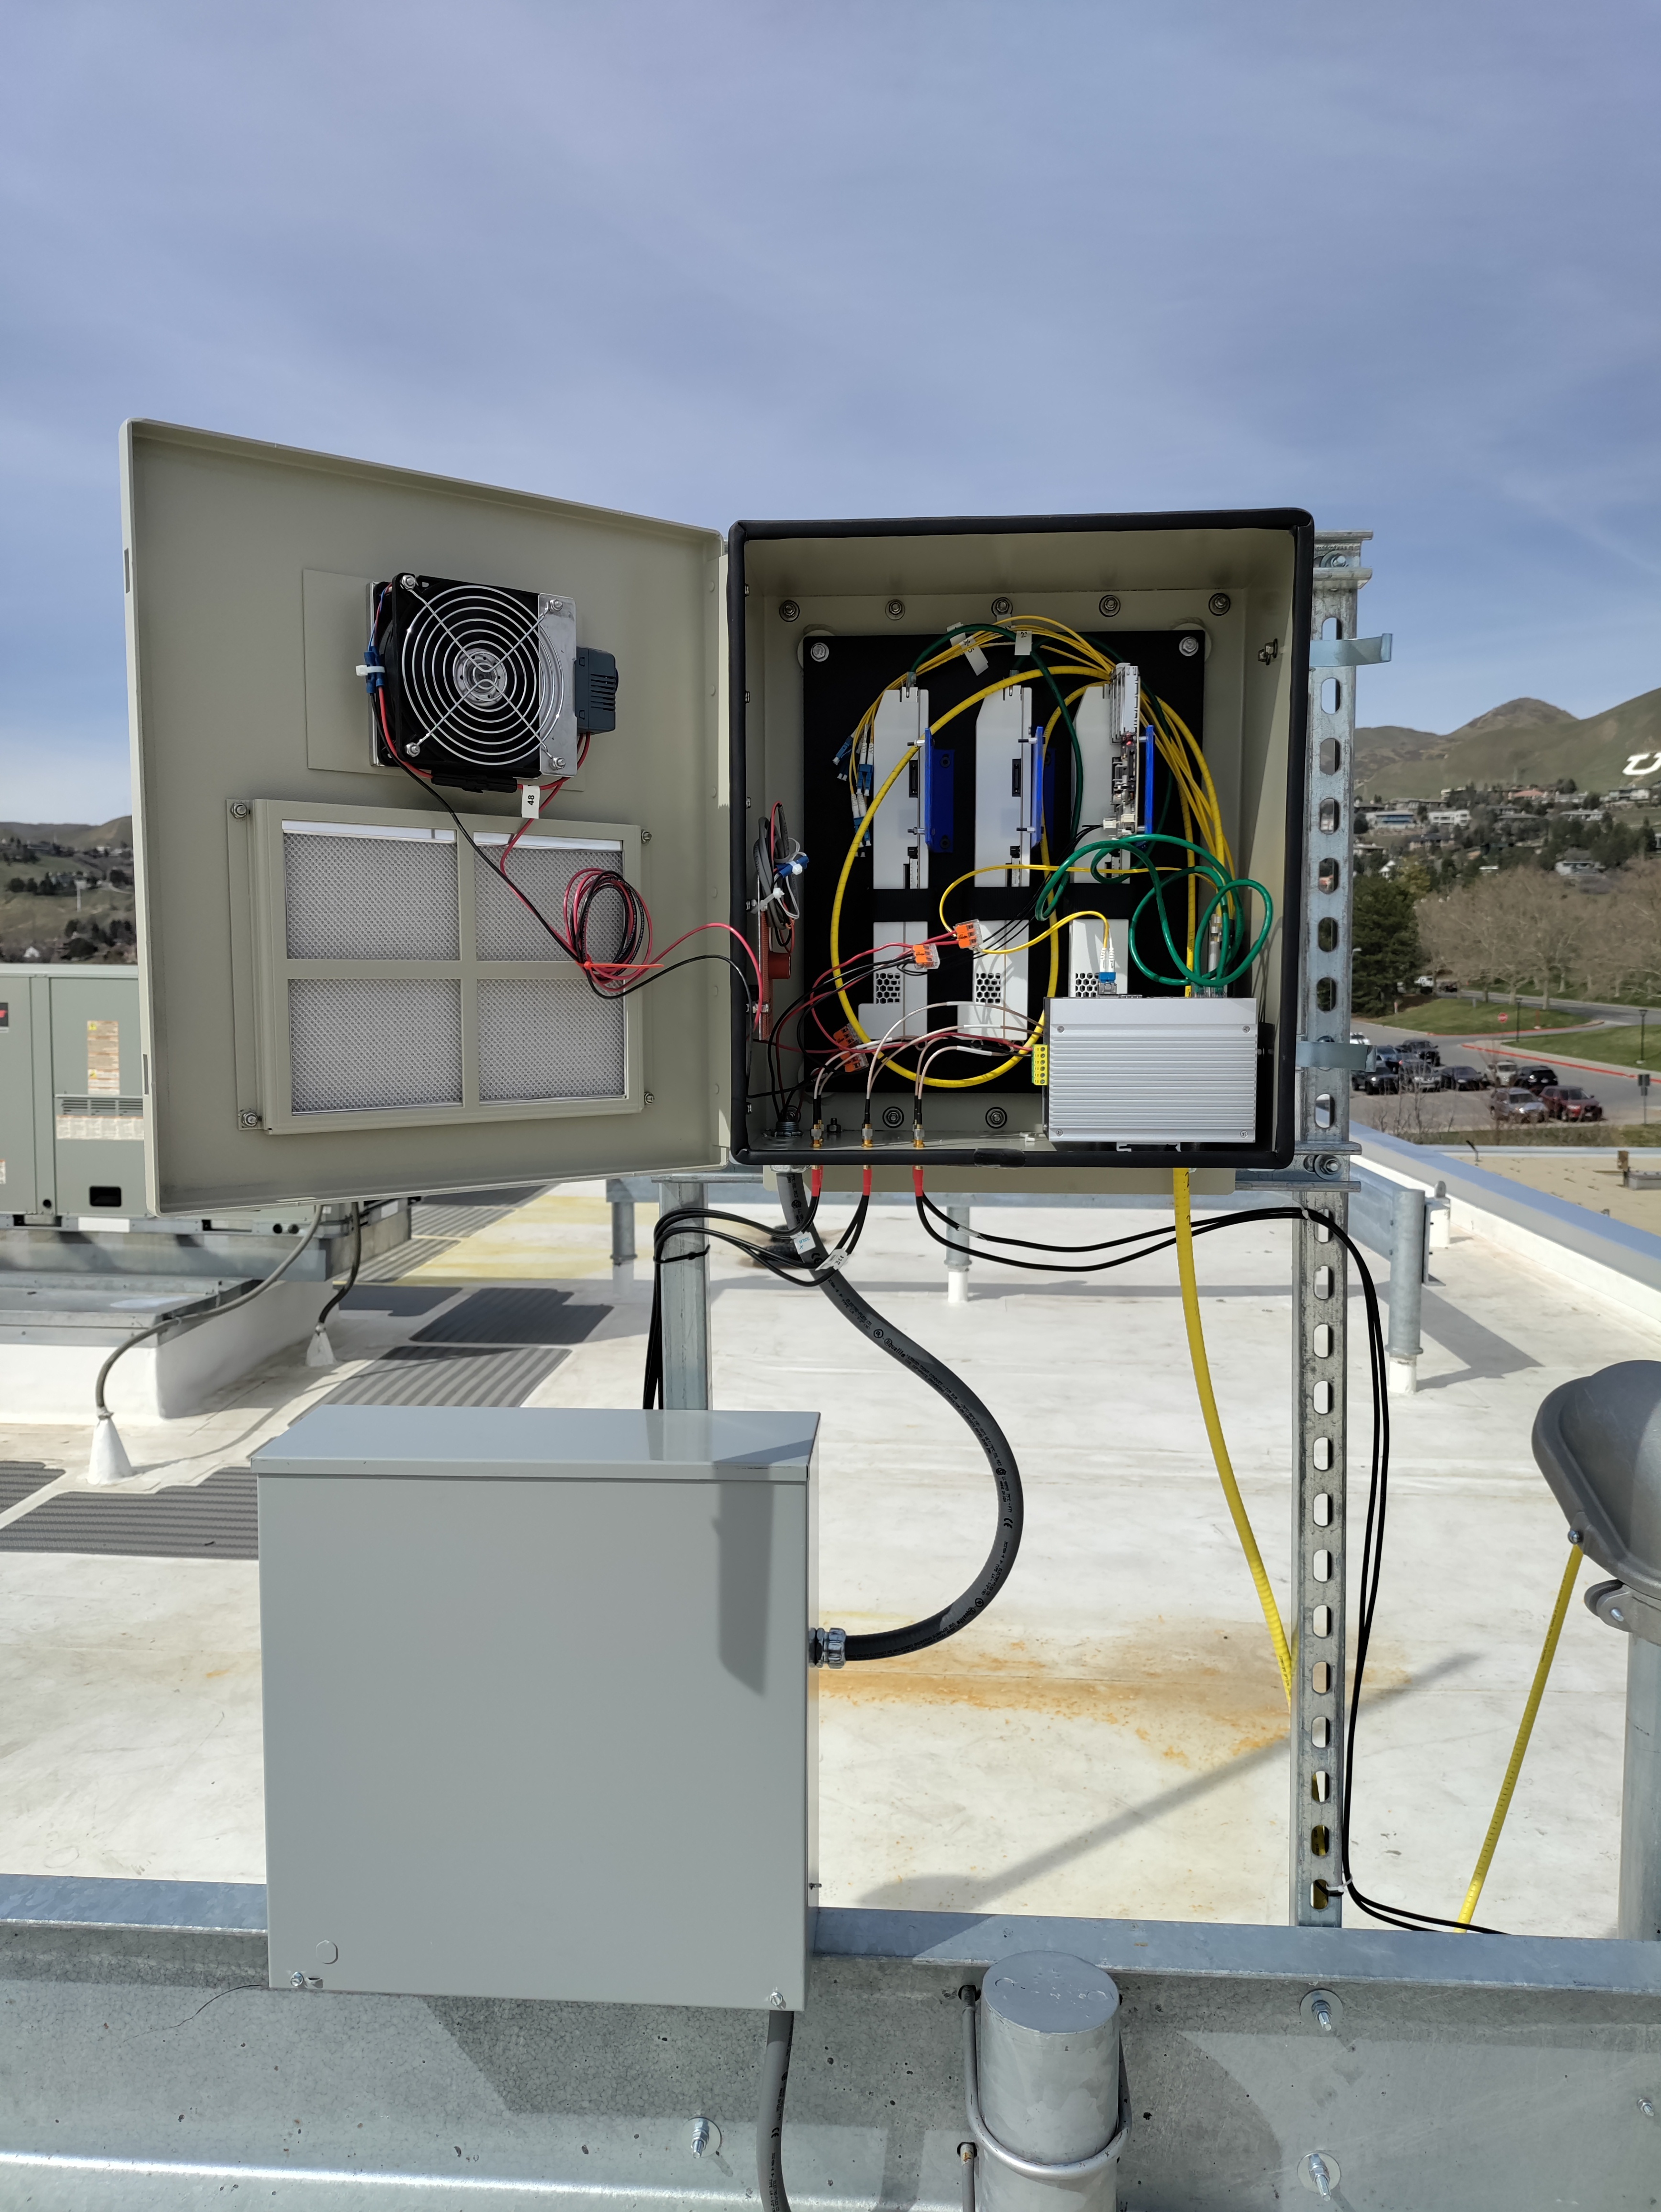
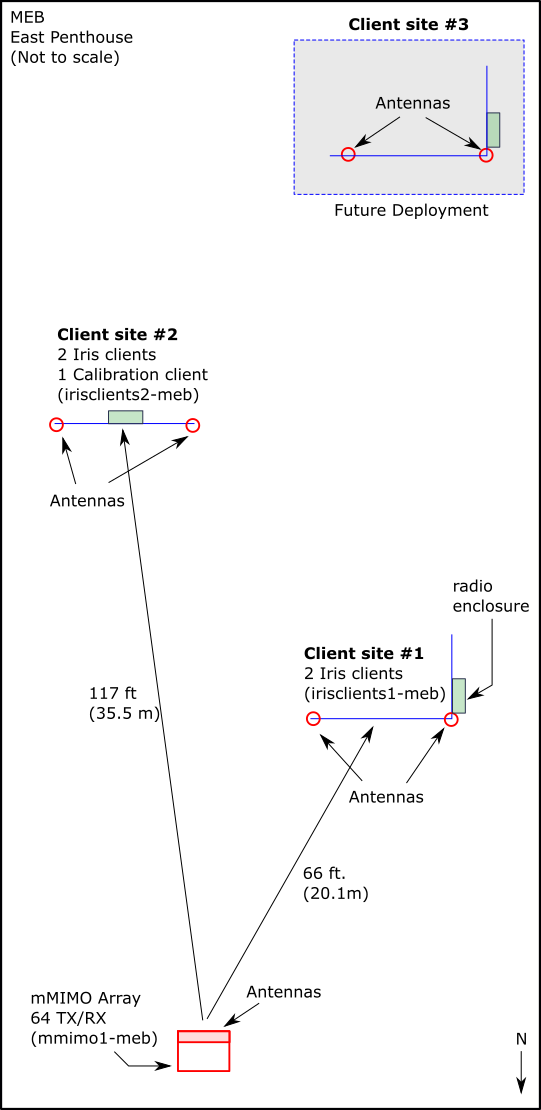
On the same rooftop, we have also deployed two other standalone 2x2 MIMO Iris SDRs that act as UEs. The pictures below show how these UEs are installed. In addition, we provide a diagram with the locations of the different devices and the distances between them. There are four UEs deployed, two at the “Clients #1” site, two at the “Clients #2” site (see image below)
NOTE: We are in the process of expanding this number to six UEs, across the three sites shown in the image.
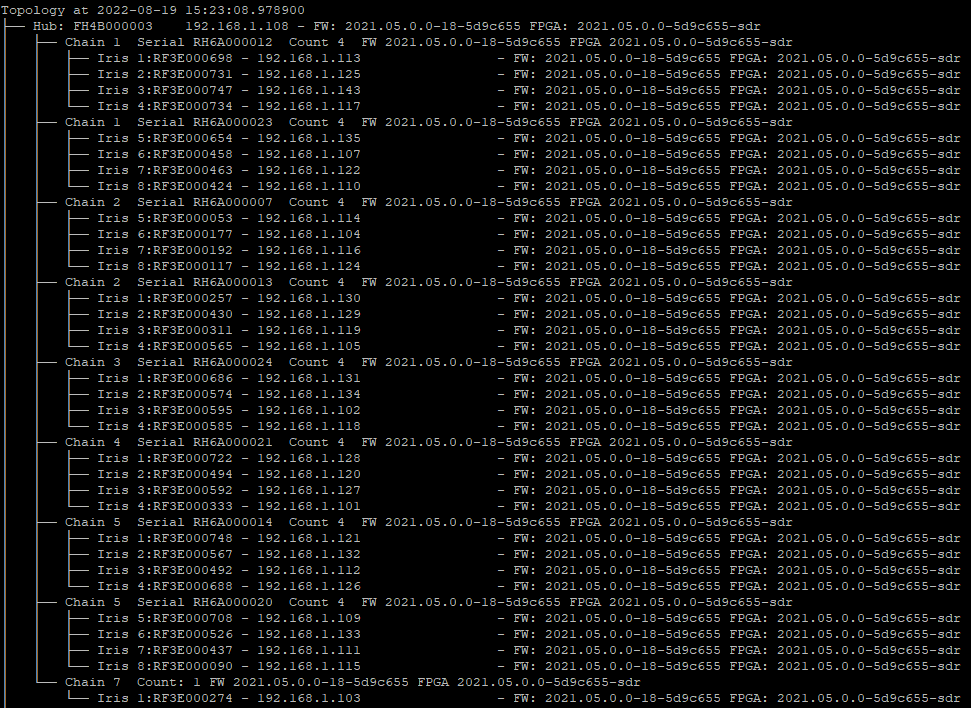
¶ Topology
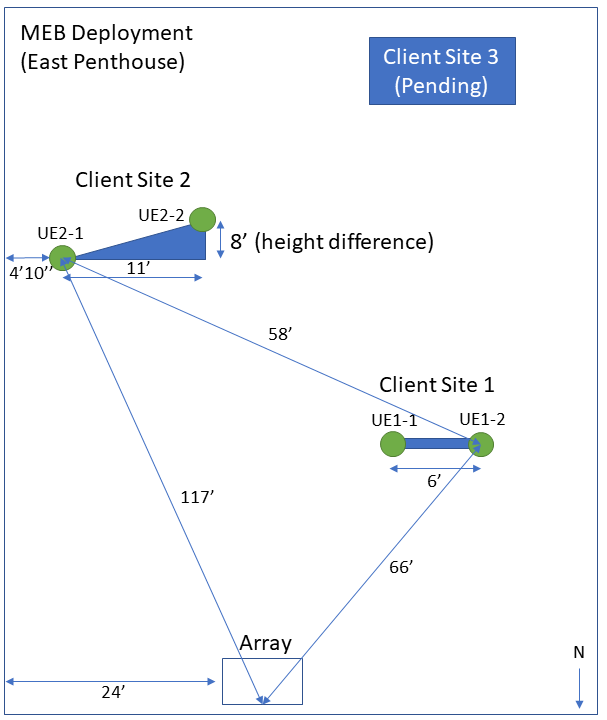
¶ Geometry (updated 10/14/2022)
|
Individual board position (facing front of the array) |
|||||
| Radio Head Serial | Left | Right | |||
| Top | RH6A000023 | RF3E000654 | RF3E000458 | RF3E000463 | RF3E000424 |
| RH6A000007 | RF3E000053 | RF3E000177 | RF3E000192 | RF3E000117 | |
| RH6A000012 | RF3E000747 | RF3E000734 | |||
| RH6A000013 | RF3E000257 | RF3E000430 | RF3E000311 | RF3E000565 | |
|
gap |
|||||
| RH6A000024 | RF3E000686 | RF3E000574 | RF3E000595 | RF3E000585 | |
| RH6A000021 | RF3E000722 | RF3E000494 | RF3E000592 | RF3E000333 | |
| RH6A000020 | RF3E000708 | RF3E000437 | RF3E000090 | ||
| Bottom | RH6A000014 | RF3E000748 | RF3E000492 | ||
NOTE: Currently, there are some boards showing RF front end faults. Most likely, these won't work well, if at all.
Please avoid using the boards whose serials have been marked (strikethrough) in the table above.
Topology
¶ Honors Rooftop Setup
¶ Geometry
|
Individual board position (facing front of the array) |
|||||
| Radio Head Serial | Left | Right | |||
| Top | |||||
|
gap |
|||||
| Bottom | |||||
NOTE: Currently, there are some boards showing RF front end faults. Most likely, these won't work well, if at all.
Please avoid using the boards whose serials have been marked (strikethrough) in the table above.
¶ Topology

¶ USTAR Rooftop Setup
¶ Geometry
|
Individual board position (facing front of the array) |
|||||
| Radio Head Serial | Left | Right | |||
| Top | |||||
|
gap |
|||||
| Bottom | |||||
NOTE: Currently, there are some boards showing RF front end faults. Most likely, these won't work well, if at all.
Please avoid using the boards whose serials have been marked (strikethrough) in the table above.
¶ Topology
¶ Faros Base Station Geometries
¶ Antenna Separation
The mMIMO base stations deployed at POWDER are capable of operating at both the BRS and CBRS bands, therefore, all antennas and RF front ends in the base stations are dual-band. HOWEVER, due to RF spectrum regulatory constraints, currently these can only be used around the CBRS band. The following table and image show both the vertical and horizontal separation among the antennas.
|
|
Dual-Band (BRS/CBRS) Antenna Separation |
|
|
|
Units (in.) |
Units (mm.) |
|
Horizontal |
3.12 |
79.35 |
|
Vertical |
2.62 |
66.68 |
The diagram below shows the separation between antennas in different radio heads (boxes). The radio heads are stacked on top of each other, leaving a vertical separation of 66.68 mm. For POWDER, please ignore the smaller CBRS size of 39.68. The antennas used in POWDER are the bigger dual-band ones, which have a horizontal separation of 79.35 mm.
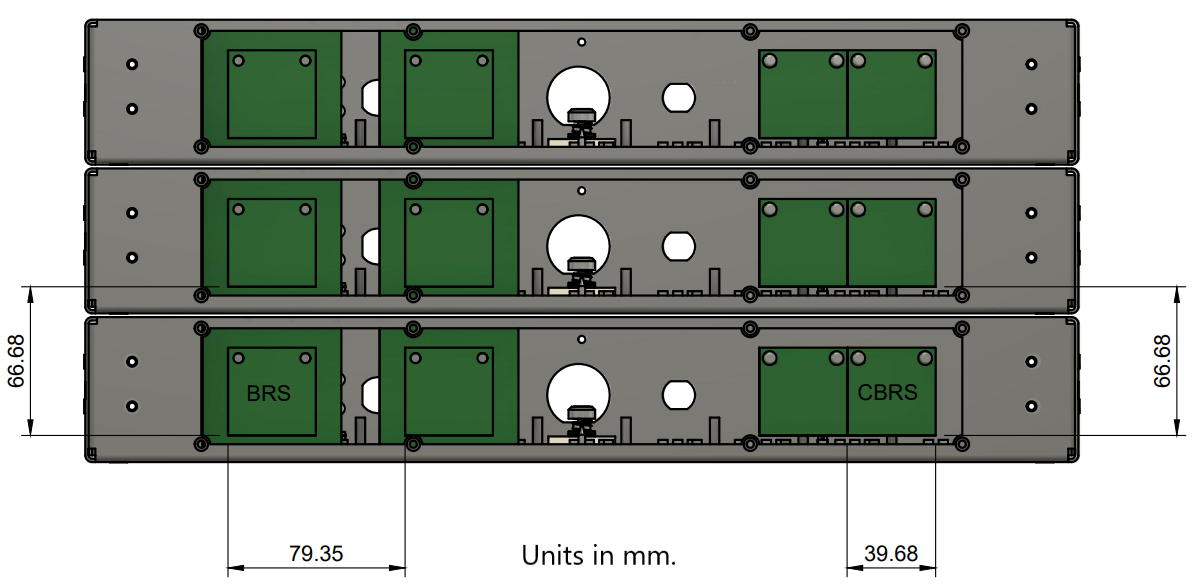
Also, each array at POWDER has two sets of four stacked radio heads, separated by a gap (see picture below). The separation between the two radio heads on both sides of the gap is about 160 mm. (measured from the center of one radio head to the center of the other).
¶ Getting Started
For users to be able to run experiments on the massive MIMO platform on The University of Utah's POWDER wireless testbed, they need to follow the next steps:
- Create POWDER account
- Create an experiment profile
- Log into the POWDER machine provided by the experiment instantiation
- Familiarize with the RENEW software and run a basic demo script
This tutorial will show you how to perform each of these steps.
¶ 1. Create POWDER user account
To get started, users need to request an account here.
¶ 2. Reserve Resources
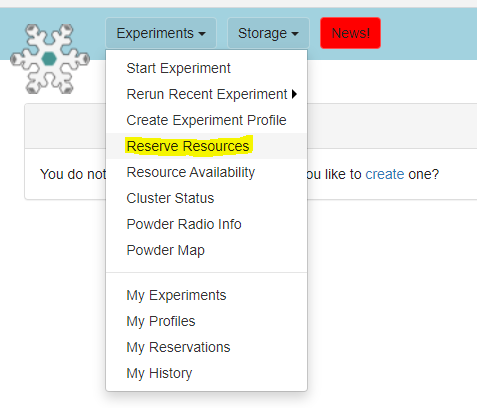
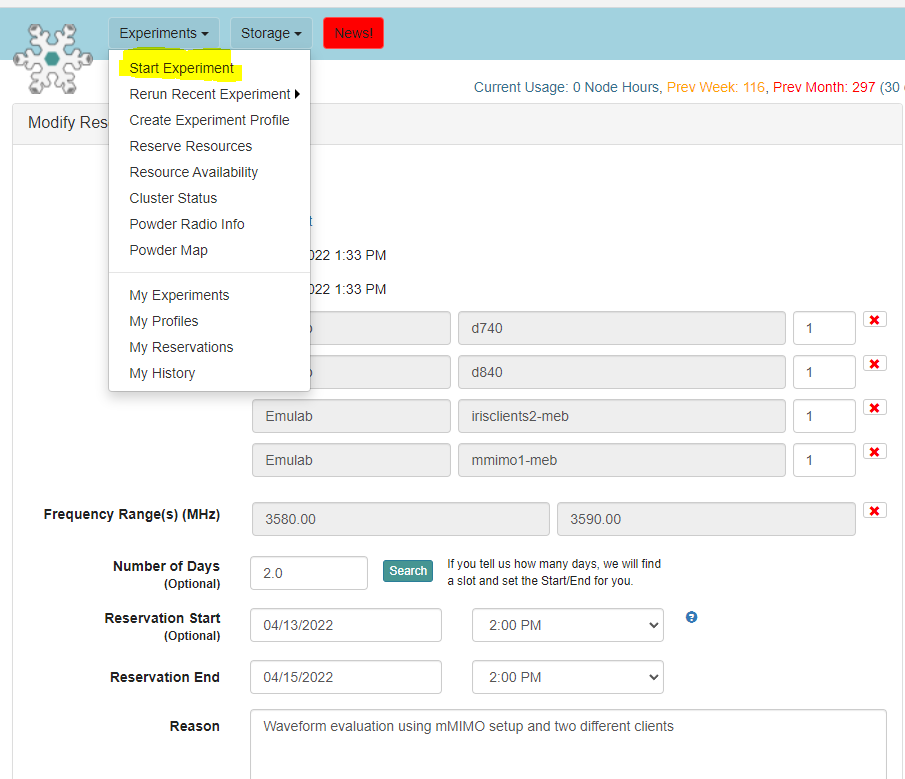
2.1. Find the “Reserve Resources" option in the main menu:
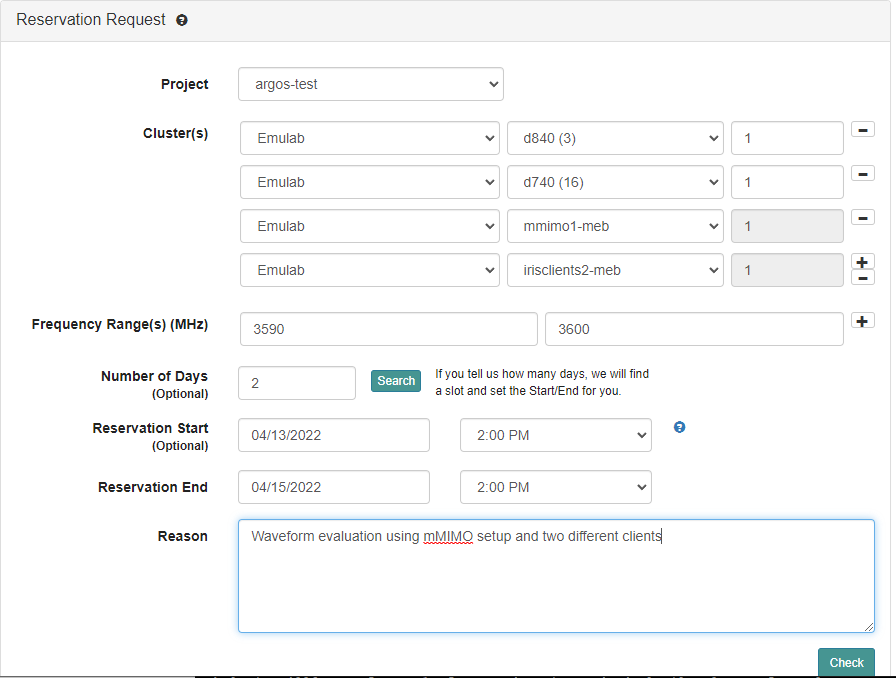
2.2. Select resources:
- MEB Outdoor Deployment: For RENEWLab, it is sufficient to pick a single d840 compute node, one
mmimo1-mebbase station and oneirisclients2-meb. This will reserve one 64-antenna mMIMO base station and two 2-antenna UEs in the rooftop of the MEB building. For Agora operation, you will also need to reserve ad740compute node.
This same page will list the different resources and their reservation status (including the available frequency ranges). Users must also select up to 10 MHz of spectrum and the number of days you are planning to reserve the resources. You can use any 10 MHz frequency block between 3540 MHz and 3600 MHz, but we suggest you use the frequency range between 3540 and 3550 MHz. This is where we've observed the least amount of third-party interference.
We provide a tool that allows you to search an adequate time window given your specification. For instance, if you select 2 days and hit the Search button, the system will find a time slot and set your start/end time accordingly. Finally, you need to provide a simple reason for the request. When done, click the “Check” button.
2.3. If all the selected resources are available, simply submit the reservation for approval. Otherwise you will need to select other resources depending on what's available.

After the request has been approved, you can go back to this website to finalize your experiment reservation.
¶ 3. Create Experiment
The next step is to instantiate the experiment, using one of the existing profiles we provide:
NOTE: We strongly recommend against using POWDER's “Rerun Recent Experiment” functionality, which allows you to simply swap in the same experiment as before. Although useful, this mode will ignore any new changes to the repository used to create the experiment. Therefore, any new fixes/upgrades will not be reflected when starting a new experiment.
3.1. In the main menu, select “Start Experiment”
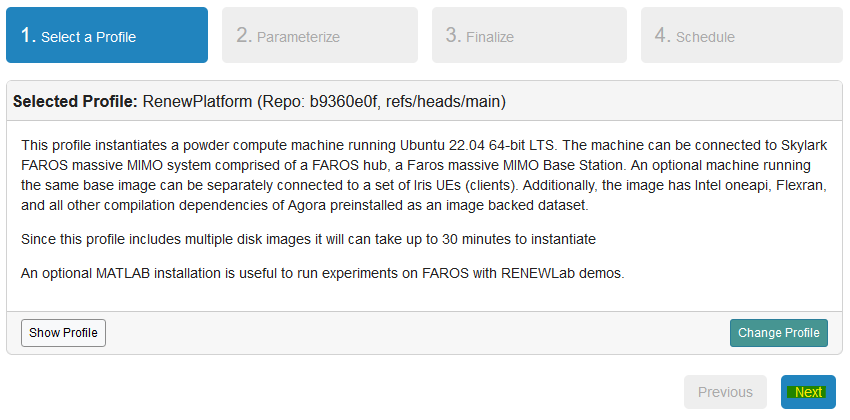
3.2. We suggest you start with the RenewPlatform profile in the renew project as it will allow you to make use of all of the RENEW software tools but will take some time to instantiate.
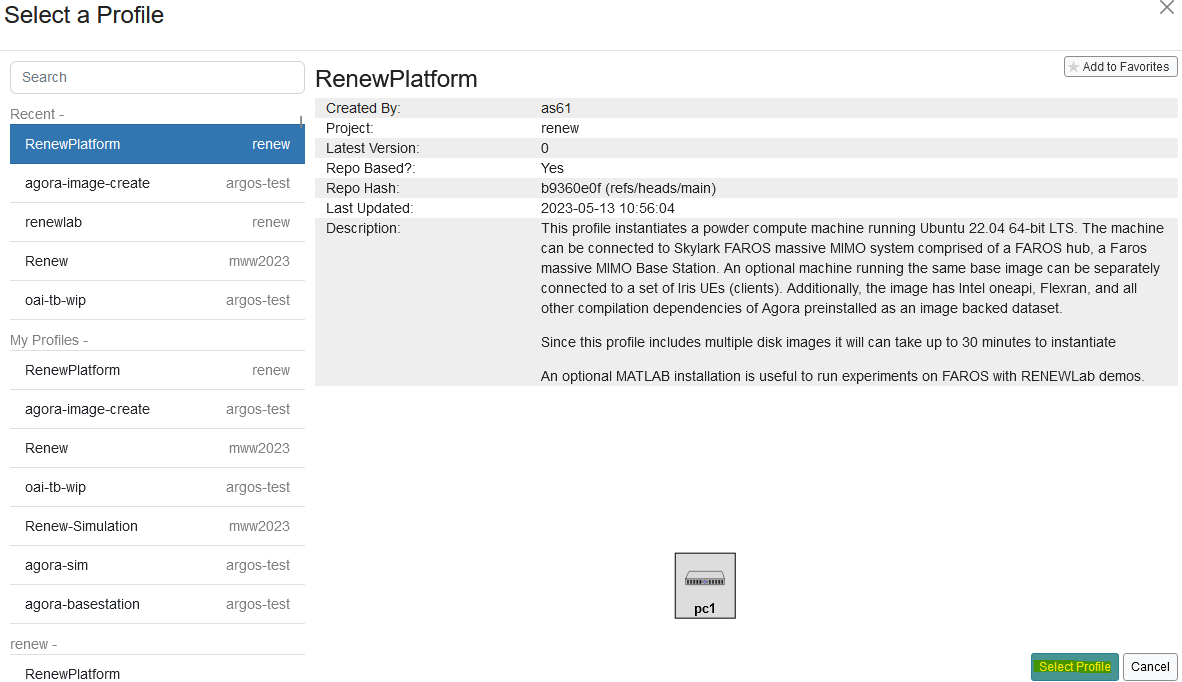
3.3. Once the profile is selected, simply click “Next”
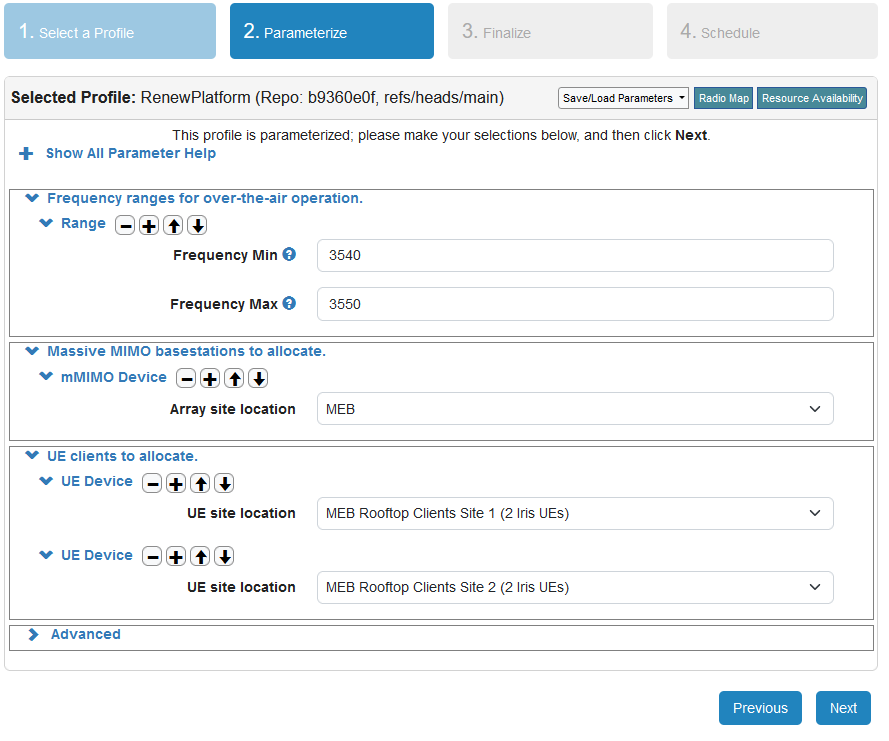
3.4. You will now select the same resources you have already reserved, including the frequency band you will be operating at.
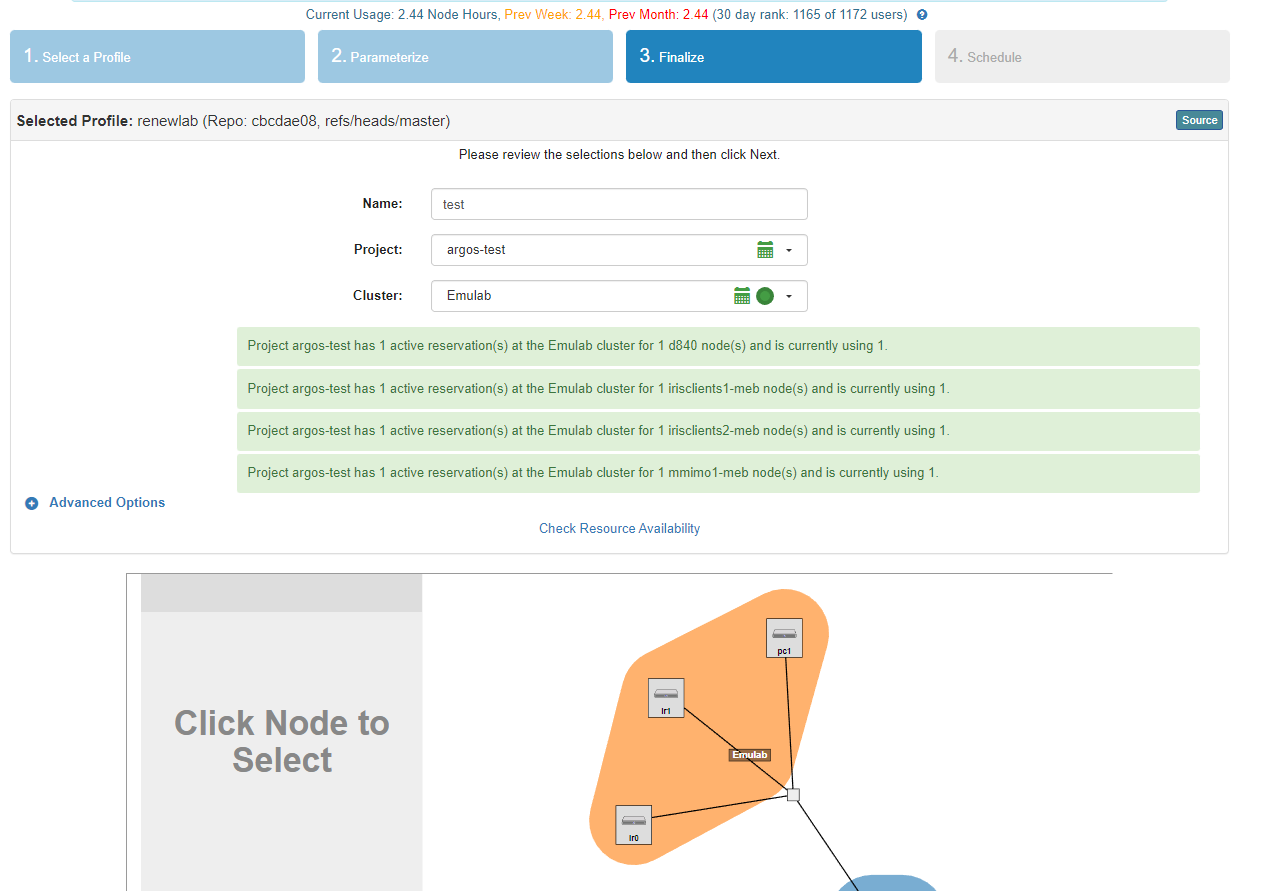
3.5. Provide a name for the experiment and select your project as well as the cluster being used (for the latter, in most cases it will be “Emulab”). Click “Next” at the bottom of the page.
3.6. Select the reservation that will be tied to this experiment and “Finish”
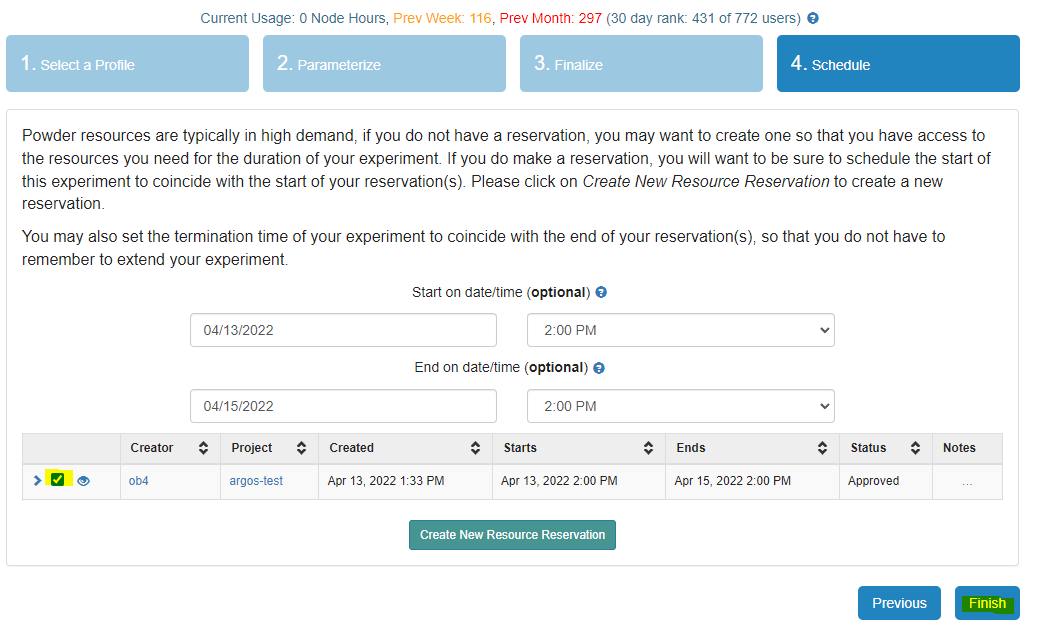
3.7. The next window will show the status of the experiment. If the reservation is some time in the future, the experiment will be scheduled to start at that point.
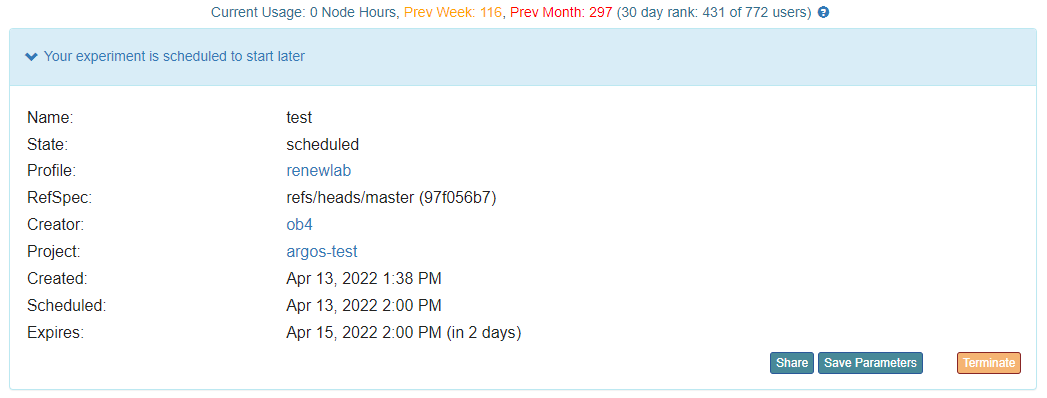
If the reservation is currently active, your experiment will begin the initialization process. Once the process is completed, users will be able to create a disk image, extend your experiment duration, or terminate the experiment.

¶ 3. Accessing the host machine
Under the List View tab, users will find the different nodes in the experiment topology. We recommend you connect to the compute nodes using the VNC terminal. You can also ssh into the host machine using the command provided in the display. Remember to add use X11 forwarding (i.e., -X option) to forward the application display to your local machine.
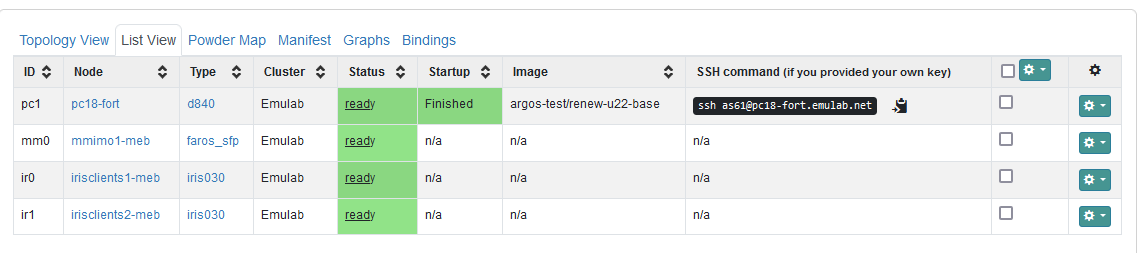
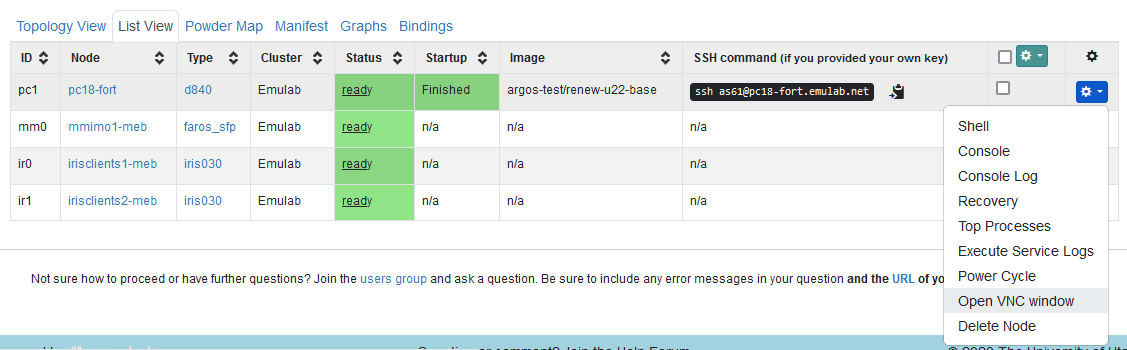
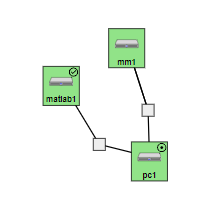
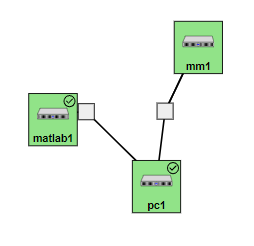
Even though the experiment and resources have been instantiated, there are some startup scripts continue to run. These scripts install several dependencies that will be needed by users. Users can verify whether these scripts are completed by inspecting the status and startup columns . In the Topology view at the top right of the compute node block, you will notice a circle with either a dot or a check mark. The check mark indicates everything has been installed and it's ready for use. See below:
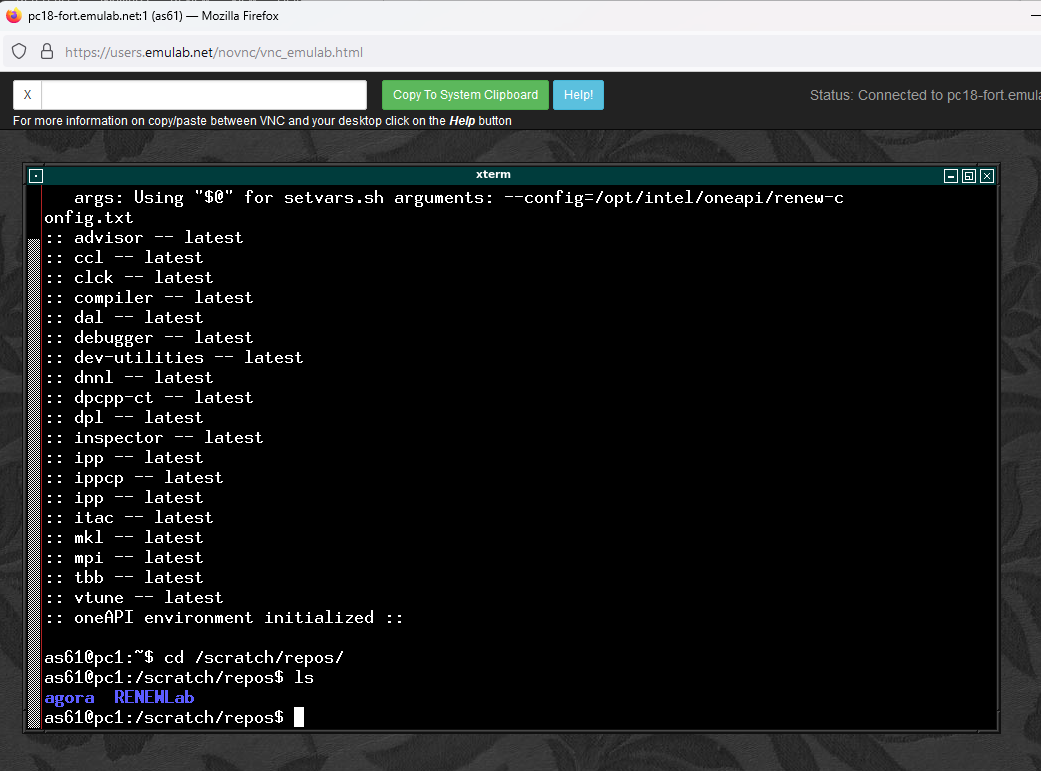
¶ 4. Running the RENEW Software
By default, the RENEW profiles clone our software repositories into the /scratch/repos/ folder. These profiles also install all the dependencies required to run the RENEW scripts, automatically, (i.e., the profile runs the following install scripts: install_cclibs.sh, install_pylibs.sh, and install_soapy.sh please do not not rerun or install any dependencies). Due to space limitations we recommend you set your working directory to /scratch/ and not the user HOME directory.
WARNING: After the experiment expires, EVERYTHING on the compute nodes are deleted. Make sure you create a disk image or download your collected data before this happens.
You are now ready to start using the RENEW software. See the RENEW quick start guide for a step-by-step tutorial.
¶ Additional Resources
¶ RENEW
¶ Agora
- Github, Source Code, Community Contribution, Feature Requests, etc
- QuickStart
- Getting Started Guide
¶ Advanced Tutorials
- MEB Uplink mMIMO (44x4)
- MEB Downlink mMIMO (20x2)
- Uplink mMIMO Multi-User
- Visualization
- Post processing
- User MAC Scheduler
- Explicit Downlink Beamforming
¶ RENEWLab
- Github, Source Code, Community Contribution, Feature Requests, etc
- QuickStart
- Getting Started Guide
¶ Advanced Tutorials
- Channel Sounding 1
- Channel Sounding 2
- Channel Sounding Video
- Beam Sweeping
- SISO
- Uplink mMIMO Single-User
- Uplink mMIMO Multi-User
- Downlink mMIMO Single-User
- Matlab Flow Video
¶ POWDER
For the most updated information on POWDER's deployment, please refer to their site.
The POWDER team has provided a map of their deployment. This map shows the locations of the available massive MIMO base stations and the UEs. Every POWDER user has access to this equipment.